Crochet Basket Pattern in 3 Sizes – Free & Easy!
I have a brand new crochet pattern to share with you today—a crochet basket pattern in 3 sizes! These small crochet baskets are perfect for organization, as well as using up leftover bits of chunky yarn in your stash.
Ok, I need to be honest with you. I designed these baskets because, frankly, I suck at organization. It’s really not my thing.
Have you been there before?
You want to organize, you really do, but it never seems to work quite right?
Or maybe you DO organize, but in a matter of weeks it’s just as messy as it was before?
*sigh*
I must admit this is me a lot of the time.
Will these baskets solve all of those organization problems?
No—but they might be able to help!
I currently use these baskets on my desk to organize lots of little things like paperclips, crochet notions, and more!

My hope is that these 3 little baskets will help you with your Spring cleaning just like they helped me!
If functionality isn’t enough of an incentive to make these, did I mention they also work up super fast?
That’s right, I made all 3 of these little baskets in one afternoon!
I can’t wait to show you how to make them. But, before we get to the pattern, let’s talk about yarn, and some other things you should know before getting started.
The Yarn
I used Lion Brand’s Hometown USA to make these baskets. I highly recommend this yarn! It is a super-bulky weight (#6), which makes for very sturdy baskets.
Check out Hometown USA here or see more patterns that use this yarn!
Now, if you don’t have Hometown USA and you’d still like to make these baskets, you can use any super-bulky yarn you have in your stash! In fact, I think these baskets make a great stash-buster.
Ad-Free Pattern
Dying to get started on these cuties right away? I have an ad-free version of this pattern that is available for just $3.99. You’ll be able to download the pattern, save it, and print it out whenever you need it.
Purchase & Print this Crochet Pattern Right Here!
The Sizes
Now let’s talk sizing!!
As I mentioned before, you can make these baskets in any of 3 sizes. The exact size may vary due to different tensions. However, let me at least outline how mine turned out:
Small Basket – 4″ base
Medium Basket – 5″ Base
Large Basket – 6″ Base
Now—I know 1″ apart may not sound like a huge difference—but it really is! When you see the baskets finished, you’ll see how nice each size is.
Pin this pattern to save it for later HERE

Reversibility
One of my FAVORITE parts of these baskets is that they are reversible! In fact, I literally had trouble deciding which way I wanted to display them in pictures. I loved them whether I turned them inside out or kept them regular.
In the end, you can see I did turn them inside out. It’s not often that the single crochet stitch looks good inside out—but the unique slip stitch edging I’ve designed really makes it shine!
Crochet Basket Pattern in 3 Sizes
OK—now that we’ve covered those details, let’s finally get on with the pattern itself!!
- To get the ad-free, PDF version of this pattern, click HERE
- To pin this pattern to your pinterest boards, click HERE
- To add this pattern to your Ravelry queue, click HERE
Materials:
- Small amount of super bulky weight yarn from your stash
- I used Lion Brand Hometown USA
- M/9mm Crochet Hook
- Yarn needle
Notes:
- Baskets are worked in joined rounds
- Chain 1 at beginning of rnds does NOT count as a stitch
Finished Measurements
Small: 4” base Medium: 5” base Large: 6” base
Abbreviations/Stitches Used (U.S.)
Chain – ch
Slip Stitch – sl st
Single Crochet – sc
Repeat – rep
Skip – sk
Space(s) – sp(s)
Chain space(s) – ch-sp(s)
Stitch(es) – st(s)
Round(s) – rnd(s)
Back Loop – BL
Instructions:
SMALL BASKET
Make a magic ring.
Rnd 1: Work 6 sc in ring. Pull ring tight, and join with sl st to first sc.
Rnd 2: Ch 1, work 2 sc in ea sc round. Join with sl st to first sc. (12 sc)
Rnd 3: Ch 1, sc in same st as sl st. 2 sc in next sc. *Sc in next sc, 2 sc in next sc. Rep from * around. Join with sl st to first sc. (18 sc)
Rnd 4: Ch 1, sc in same st as sl st. Sc in next sc, 2 sc in next sc. *Sc in next 2 sc, 2 sc in next sc. Rep from * around. Join with sl st to first sc. (24 sc)
Rnd 5: Ch 1, sc in BL of ea sc around. Join with sl st to first sc. (24 BL sc).
Rnd 6-8: Ch 1, sc in ea sc around. Join with sl st to first sc. (24 sc). Fasten off.
MEDIUM BASKET
Make a magic ring.
Rnd 1: Work 6 sc in ring. Pull ring tight, and join with sl st to first sc.
Rnd 2: Ch 1, work 2 sc in ea sc round. Join with sl st to first sc. (12 sc)
Rnd 3: Ch 1, sc in same st as sl st. 2 sc in next sc. *Sc in next sc, 2 sc in next sc. Rep from * around. Join with sl st to first sc. (18 sc)
Rnd 4: Ch 1, sc in same st as sl st. Sc in next sc, 2 sc in next sc. *Sc in next 2 sc, 2 sc in next sc. Rep from * around. Join with sl st to first sc. (24 sc)
Rnd 5: Ch 1, sc in same st as sl st. Sc in next 2 sc. 2 sc in next sc. *Sc in next 3 sc, 2 sc in next sc. Rep from * around. Join with sl st to first sc. (30 sc)
Rnd 6: Ch 1, sc in BL of ea sc around. Join with sl st to first sc. (30 BL sc).
Rnd 7-9: Ch 1, sc in ea sc around. Join with sl st to first sc. (30 sc). Fasten off.
LARGE BASKET
Make a magic ring.
Rnd 1: Work 6 sc in ring. Pull ring tight, and join with sl st to first sc.
Rnd 2: Ch 1, work 2 sc in ea sc round. Join with sl st to first sc. (12 sc)
Rnd 3: Ch 1, sc in same st as sl st. 2 sc in next sc. *Sc in next sc, 2 sc in next sc. Rep from * around. Join with sl st to first sc. (18 sc)
Rnd 4: Ch 1, sc in same st as sl st. Sc in next sc, 2 sc in next sc. *Sc in next 2 sc, 2 sc in next sc. Rep from * around. Join with sl st to first sc. (24 sc)
Rnd 5: Ch 1, sc in same st as sl st. Sc in next 2 sc. 2 sc in next sc. *Sc in next 3 sc, 2 sc in next sc. Rep from * around. Join with sl st to first sc. (30 sc)
Rnd 6: Ch 1, sc in same st as sl st. Sc in next 3 sc. 2 sc in next sc. *Sc in next 4 sc, 2 sc in next sc. Rep from * around. Join with sl st to first sc (36 sc)
Rnd 7: Ch 1, sc in BL of ea sc around. Join with sl st to first sc. (30 BL sc).
Rnds 8-11: Ch 1, sc in ea sc around. Join with sl st to first sc. (30 sc). Fasten off.
EDGING (ALL BASKETS)
Edging Rnd 1: Join new color with a sl st in any st. Sl st around entire rim of basket.
Below you can see the first row of the basket edging (as well as some pictures of the beginning of the basket as well!)
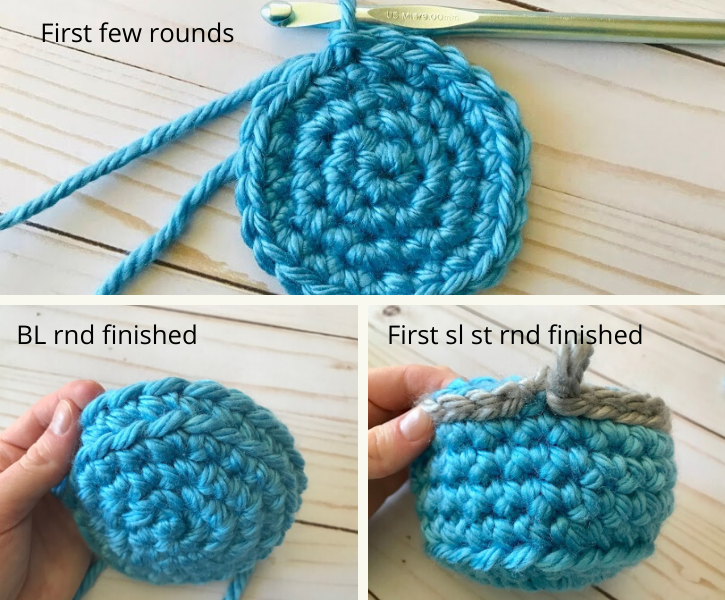
Edging Rnd 2: We will now work with the same new color into the back loop of the last sc row with regular color (see picture below). Sl st in BL of each sc from this row around. Sl st to beginning sl st. Fasten off.

Finishing: Turn your basket inside out (or decide which way you like it best).
One last thing I did for a nice finish was to take my yarn needle and end, and weave around the knot to cover it up. The goal is to weave around it so it looks like the top of another regular stitch. It doesn’t have to be perfect, but it helps the finish look a bit better! Lastly, weave in all ends.
That’s all there is to it! I hope you enjoyed this pattern. If you have any questions, don’t hesitate to email me, rachel@desertblossomcrafts.com.
To view all of my free patterns, click HERE.
Happy crocheting!


